Secure Coding Best Practices for Microservice Architectures
- HacWare

- Jan 1, 2023
- 4 min read

The pace of transition from monolithic architectures towards microservice-based applications is on an uptrend. However, under this new paradigm of modular services and functions, there exist many novel and unforeseen security considerations.

In this article, we’ll discuss secure coding best practices for microservice architectures using OAuth 2.0. We’ll cover poor practices, best practices, and an OAuth vulnerability scanner that developers can use to ensure the microservices they create are secure. In the end, the reader will have a better grasp of configuring and testing microservice-based OAuth implementations.
Why is it important to secure microservices?
When working with independently deployed functions and services rather than monolithic applications, new security challenges arise. For instance, traditional architectures typically store the application state internally, whereas microservices-based designs are stored externally, presenting a new attack vector for adversaries. Additionally, microservice architectures rely on complex arrangements of APIs to communicate information between hundreds or thousands of services, another challenge unique to microservice developers. For the remainder of this article, we’ll focus on addressing these challenges as they relate to securing microservices with the OAuth framework. Also check out the video tutorial that explains more about this topic.
Poor Practices and Best Practices
We’ll use this section to highlight some of the poor and best practices developers should know to ensure their microservices are secure.
#1 - Not using secure sockets and encryption
It’s important to remember that OAuth’s built-in security features are limited in scope. Rather than rely on out-of-the-box methods, true security comes through a combination of proper implementation as well as input validation, SSL, and data encryption. Data encryption and SSL on top of OAuth will help to insulate your microservices from a range of threats and breaches.
#2 - Not using refresh tokens. Not setting a lifetime for access tokens
Another bad practice that developers overlook when implementing OAuth is not using refresh tokens or neglecting to set a lifetime for access tokens. Refresh tokens are a tried-and-tested security measure that lessens the chance of a breach as user’s sessions are ended after sitting idle for a certain period. Going further, giving an access token a definitive lifetime forces a user to sign in again after a specified time period which can range from a single session to several weeks.
#3 - Not validating redirect URLs
Misconfigured authorization servers are prone to URL redirect attacks due to ambiguity in the way the OAuth standard is designed to handle pattern matching. Bad actors are known to attack authorization servers that lack adequate URL redirect validation allowing the hackers to steal access tokens as well as breaking client identification or authentication. It is of the utmost importance that you configure your authorization servers so that redirects are properly validated in order to prevent tokens from being sent to servers owned by bad actors.
How to test OAuth setup?
Testing whether your OAuth setup is implemented according to best practices can seem like a daunting task. Thankfully, however, there are tools designed specifically to make the job a lot simpler. One is called KOAuth, an open-source, dynamic scanning program written in Go that’s designed to automate OAuth testing.
With KOAuth, you can scan your authorization server to discover a range of vulnerabilities from poor practices to implementation errors. KOAuth is designed to be flexible, with over 20 built-in validation checks as well as the option to write custom checks unique to your environment. After each scan, a comprehensive report is generated detailing the outcome which allows developers to clearly see what needs to be fixed.
To learn more about KOAuth, check out the official GitHub.
Prerequisites
You must download and install Go onto your machine before running the steps below.
After you’ve downloaded KOAuth from GitHub, usage is straightforward.
First, create a .json file with the name of “configfile.json” inside the KOAuth folder you just downloaded. You can refer to the included “config-template.json” for specifics. Simply replace each variable with the information for your website.
{
  "redirect_url": "https://example.com/callback",
  "client_id": "12838298jdfusj87h38278",
  "client_secret": "asdjasd8asj8asdj",
  "scopes":["profile", "email"],
  "endpoint": {
      "auth_url": "https://accounts.google.com/o/oauth2/auth",
      "token_url": "https://oauth2.googleapis.com/token"
  }
}
Next, after creating the configfile.json file, it’s time to build the program. Open a terminal in the same path as the KOAuth folder you downloaded then run:
go build
./KOAuth --config=configfile.json --timeout=4
To define custom checks, create a checks json file. This file defines the poor OAuth practice to check for.
cd config
mkdir resources
vi checks.json
The sample check file below tests for redirection failures.
{
    "name":"redirect-uri-add-subdomain",
    "risk":"medium",
    "description":"Adds a subdomain to redirect_uri",
    "requiresSupport":["implicit-flow-supported"],
    "references":"",
    "steps": [
        {
            "flowType":"implicit",
            "authURLParams":{"redirect_uri":["{{{REDIRECT_SCHEME}}}://maliciousdomain.{{{REDIRECT_DOMAIN}}}{{{REDIRECT_PATH}}}"]},
            "deleteURLParams":["redirect_uri"],
            "requiredOutcome": "FAIL"
        }
    ]
}
The next step is to start the program using this command:
./KOAuth --config=configfile.json --checks=./config/resources/checks.json --timeout=4
The --config flag points to the configfile.json we created above. --checks points to the folder that contains the default checks and --timeout is the amount of time each tab will wait before it’s considered a failed request.
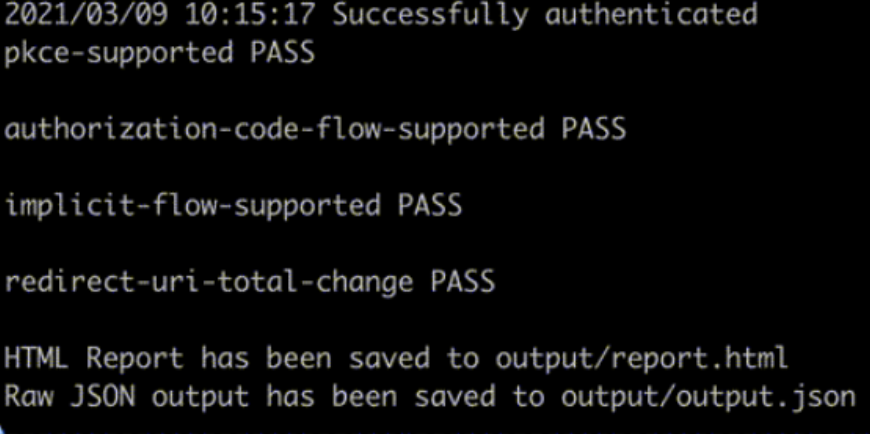
Once you have entered the previous command, your web browser will launch asking you to authenticate. Testing will commence immediately after you’ve entered your authentication credentials. After a brief period of time the terminal will output preliminary results which will look similar to this:

For a closer look, you can view the report with this command: "output/report.html"
$ output/report.htmlThis will open a web browser allowing you to review the status of your OAuth implementation in more detail.

Conclusion
In the hands of a competent developer, OAuth can save valuable time and effort when it comes to securing microservice applications. However, given the openness of the standard, it’s easy to misconfigure your server resulting in security holes that leave your apps vulnerable to attack.
After reading this article, you should now be aware of the biggest implementation hurdles and how to avoid them.
HacWare makes it super easy for Software Developers and IT teams to launch hyper custom cybersecurity education solutions to combat phishing attacks. Learn more about HacWare at hacware.com.


